How to Get a VOIP Number in Europe
I spent a few days looking into how to get a VOIP number in Europe and it wasn't as easy as I thought. That's why I created this article to help people who run into the same problem.
 Simon SomlaiPublished
I spent a few days looking into how to get a VOIP number in Europe and it wasn't as easy as I thought. That's why I created this article to help people who run into the same problem.
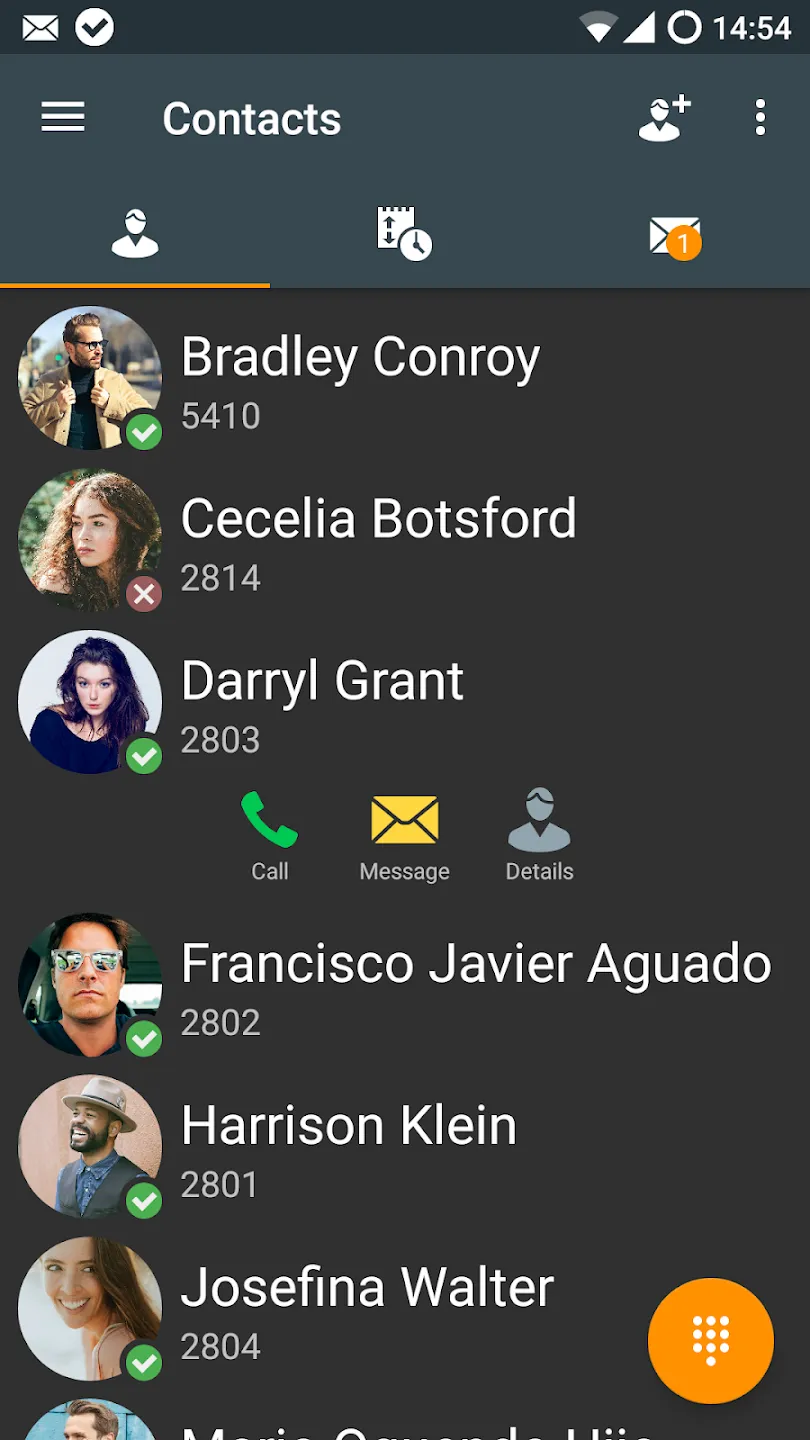
This guide will walk you through building a working VoIP setup: a Twilio phone number for voice and SMS, routed through a SIP Sipnetic app on your Android or IOS, with call/message/voicemail logic handled by Cloudflare Workers. All for an European number.
This is for a technical audience.
What you'll end up with
- A Twilio number that can make and receive calls through Sipnetic.
- Incoming SMS and voicemail will be forwarded to your email, with an auto-reply nudging people to WhatsApp/Signal
Why would you want a VOIP number?
- Cheaper since it calls over the internet vs over landlines.
- More features like call forwarding, voicemail-to-email, auto-attendants/IVR menus, call recording, ring groups, analytics, video calling, SMS, and CRM/helpdesk integration.
- Easy to replace/rotate/have multiples/hand-out to strangers
- No need for a SIM card in your phone anymore, so better for privacy
Prerequisites
- A Twilio account with an approved regulatory bundle (required for many EU numbers).
- The Sipnetic softphone app (iOS/Android).
- A free Cloudflare account to set-up workers to handle the requests
- A Mailjet account and API key (or swap in any transactional email API)
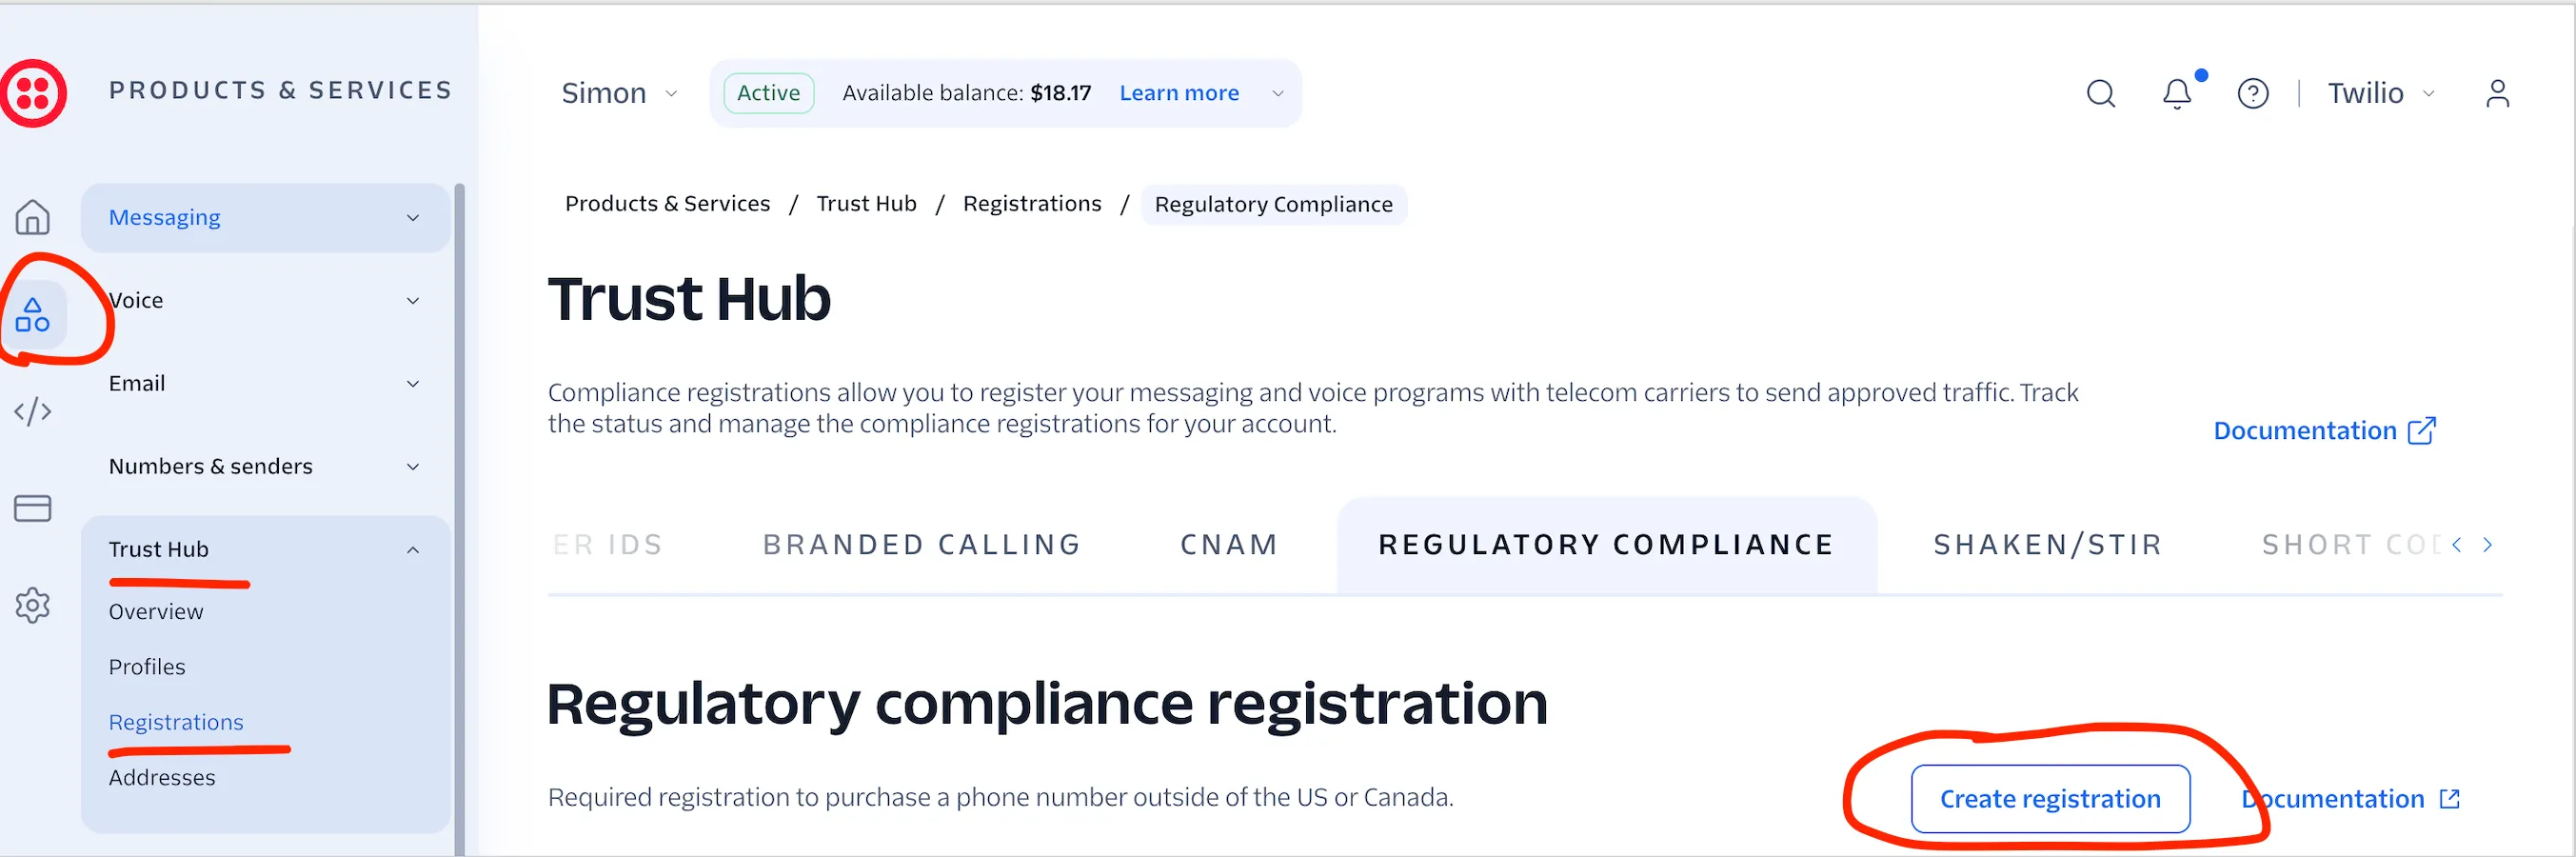
1. Set up and create your regulatory bundle in twillio
Products & Services -> Trust Hub → Registrations -> Regulatory Compliance. This will take a while but is standard KYB/C.
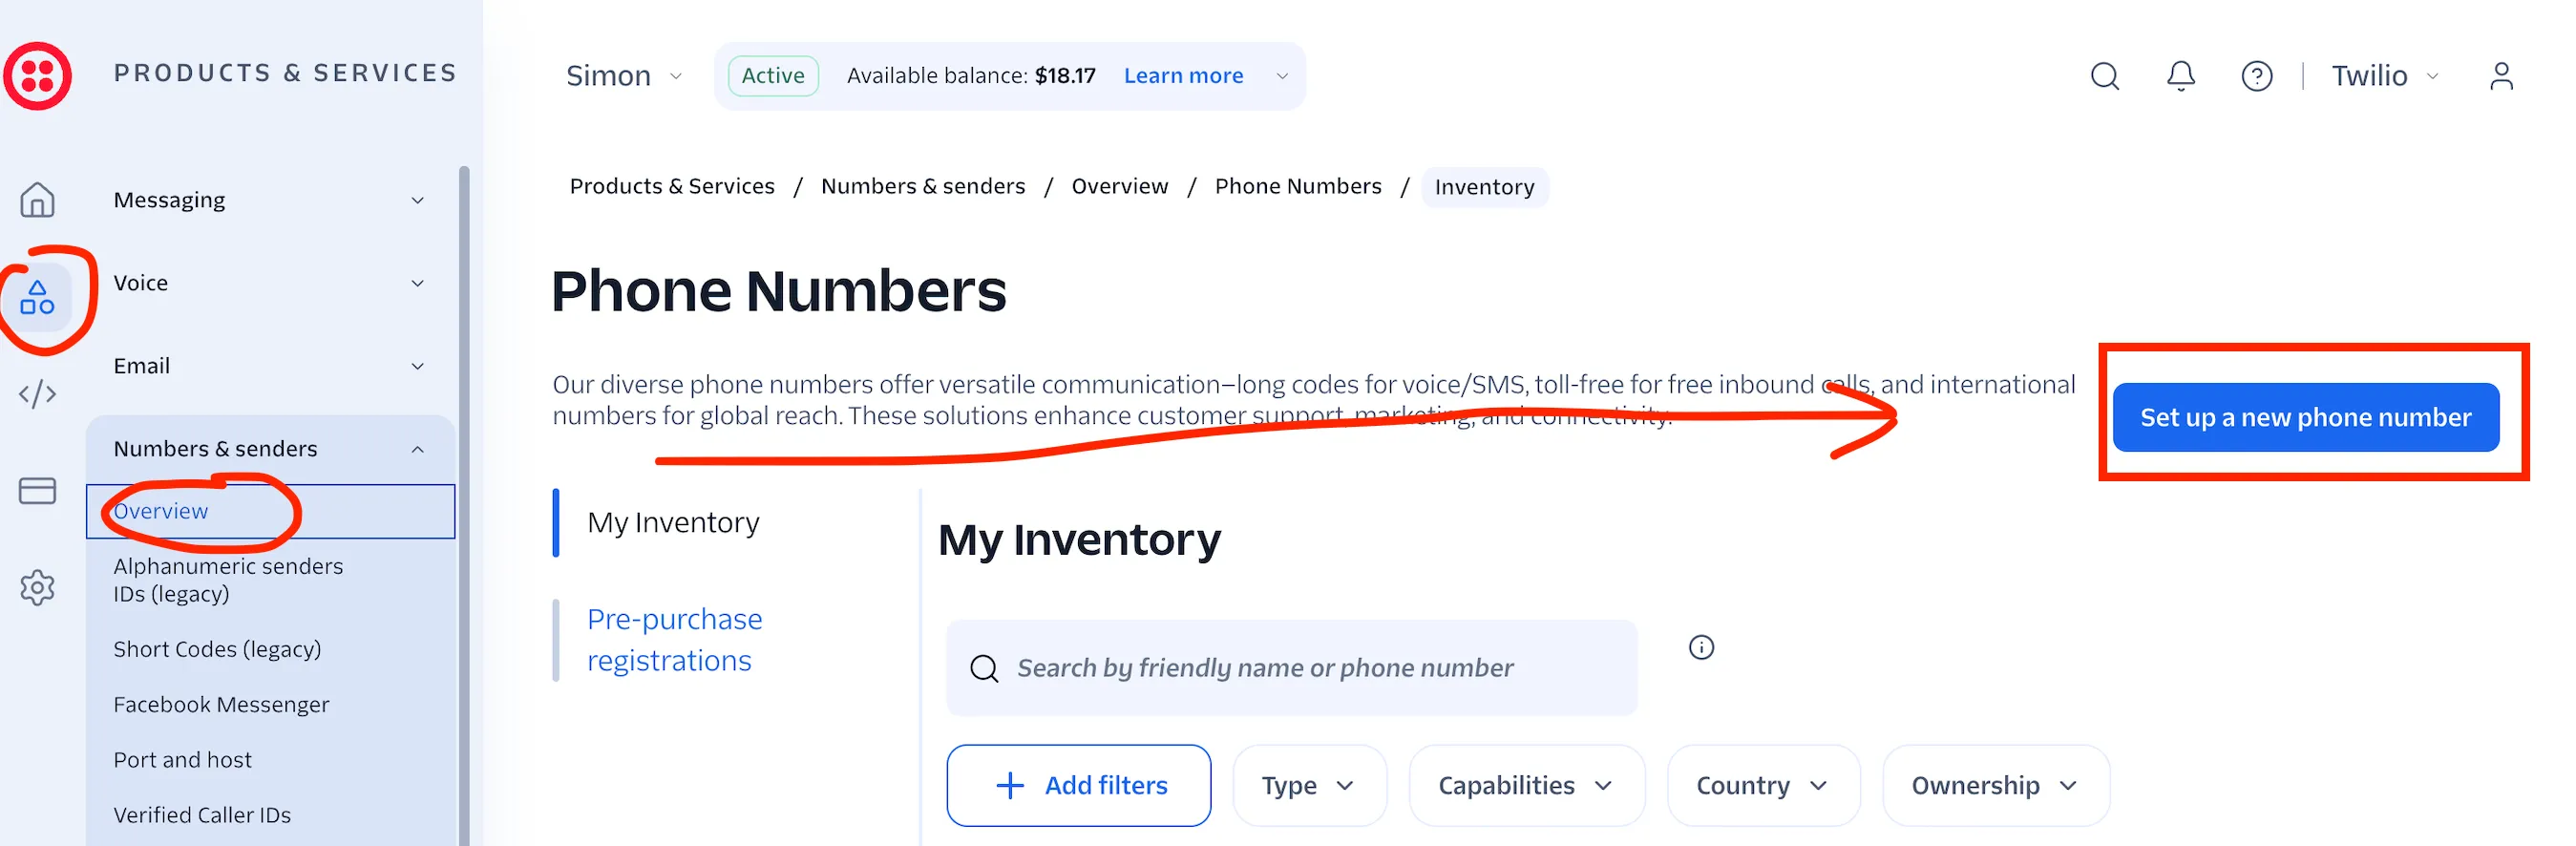
2. Buy a number
Go to Products & Services -> Numbers & Senders → Overview → Set up a new phone number. Be sure to choose Active Region: Ireland (IE1). You don't want your European phone calls to be handled by a US-based server because of speed. Buy a local number.
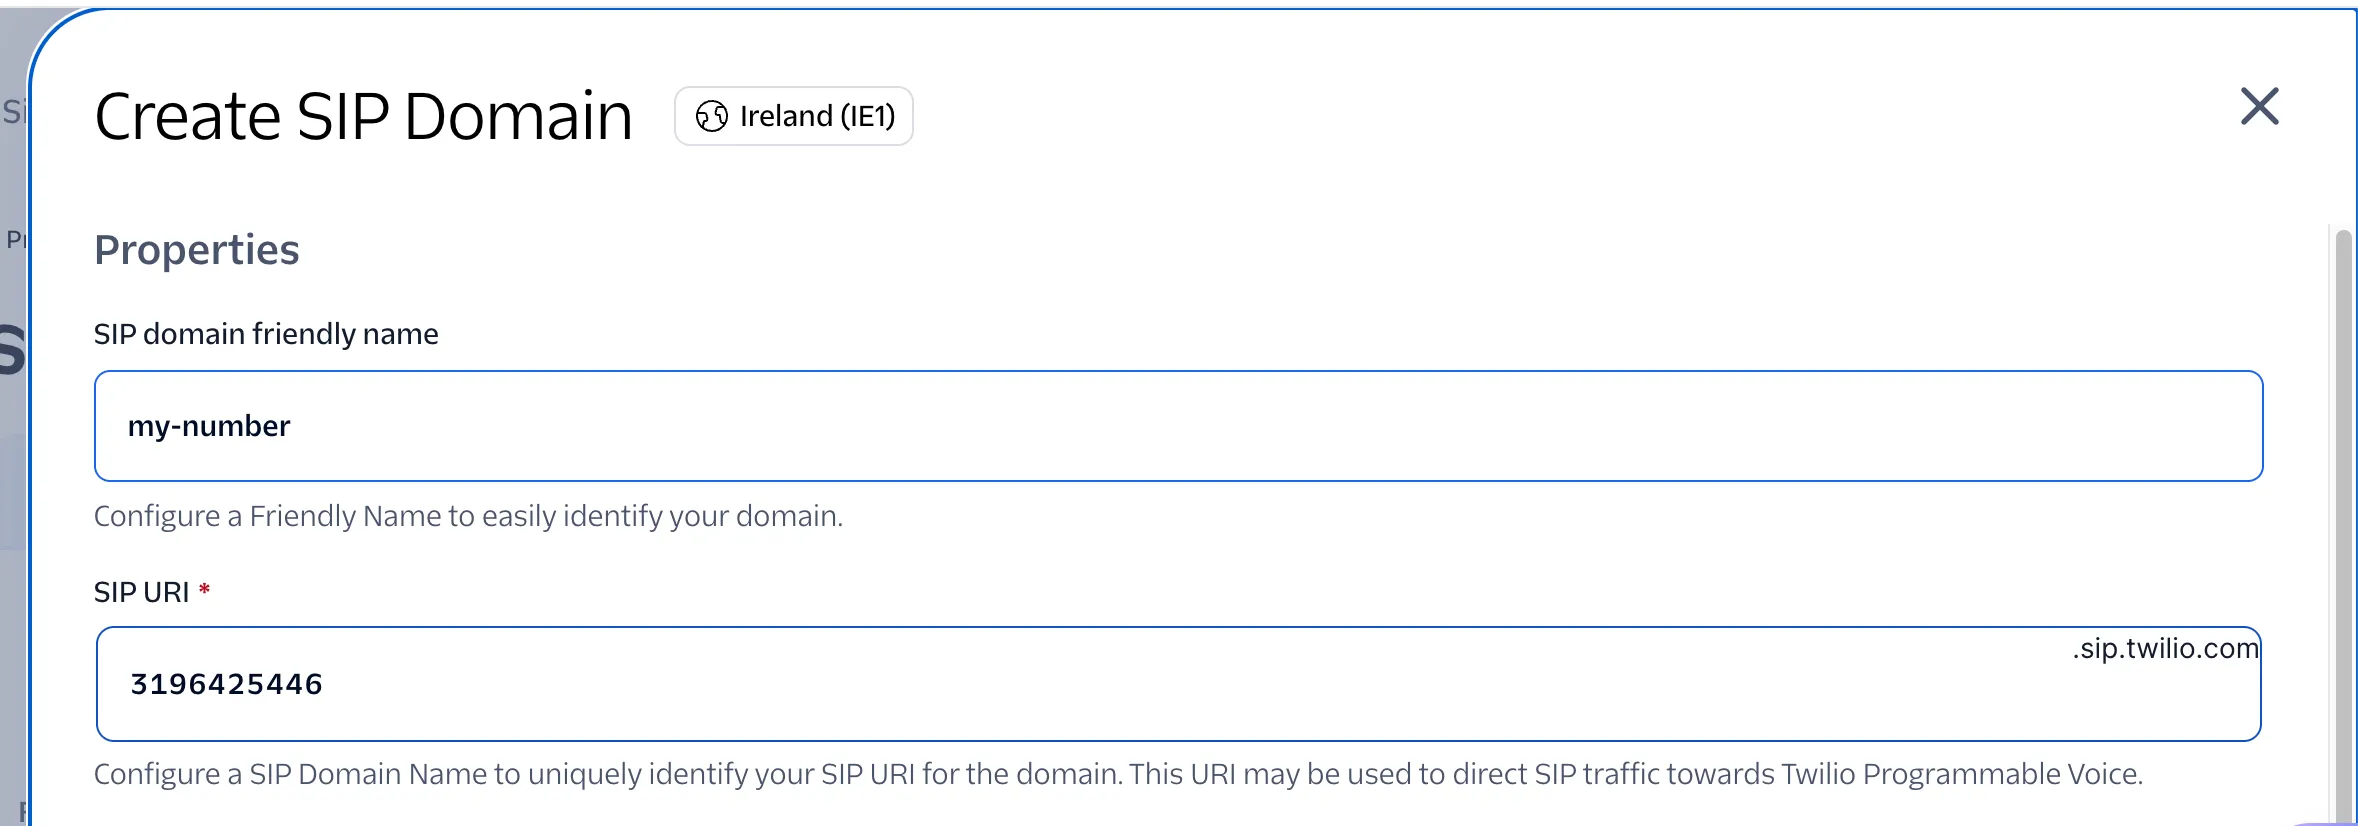
3. Create a Credential List + SIP Domain
Go to Products & Services -> Voice → SIP Domains. Ensure everything is in Ireland (IE1)
-
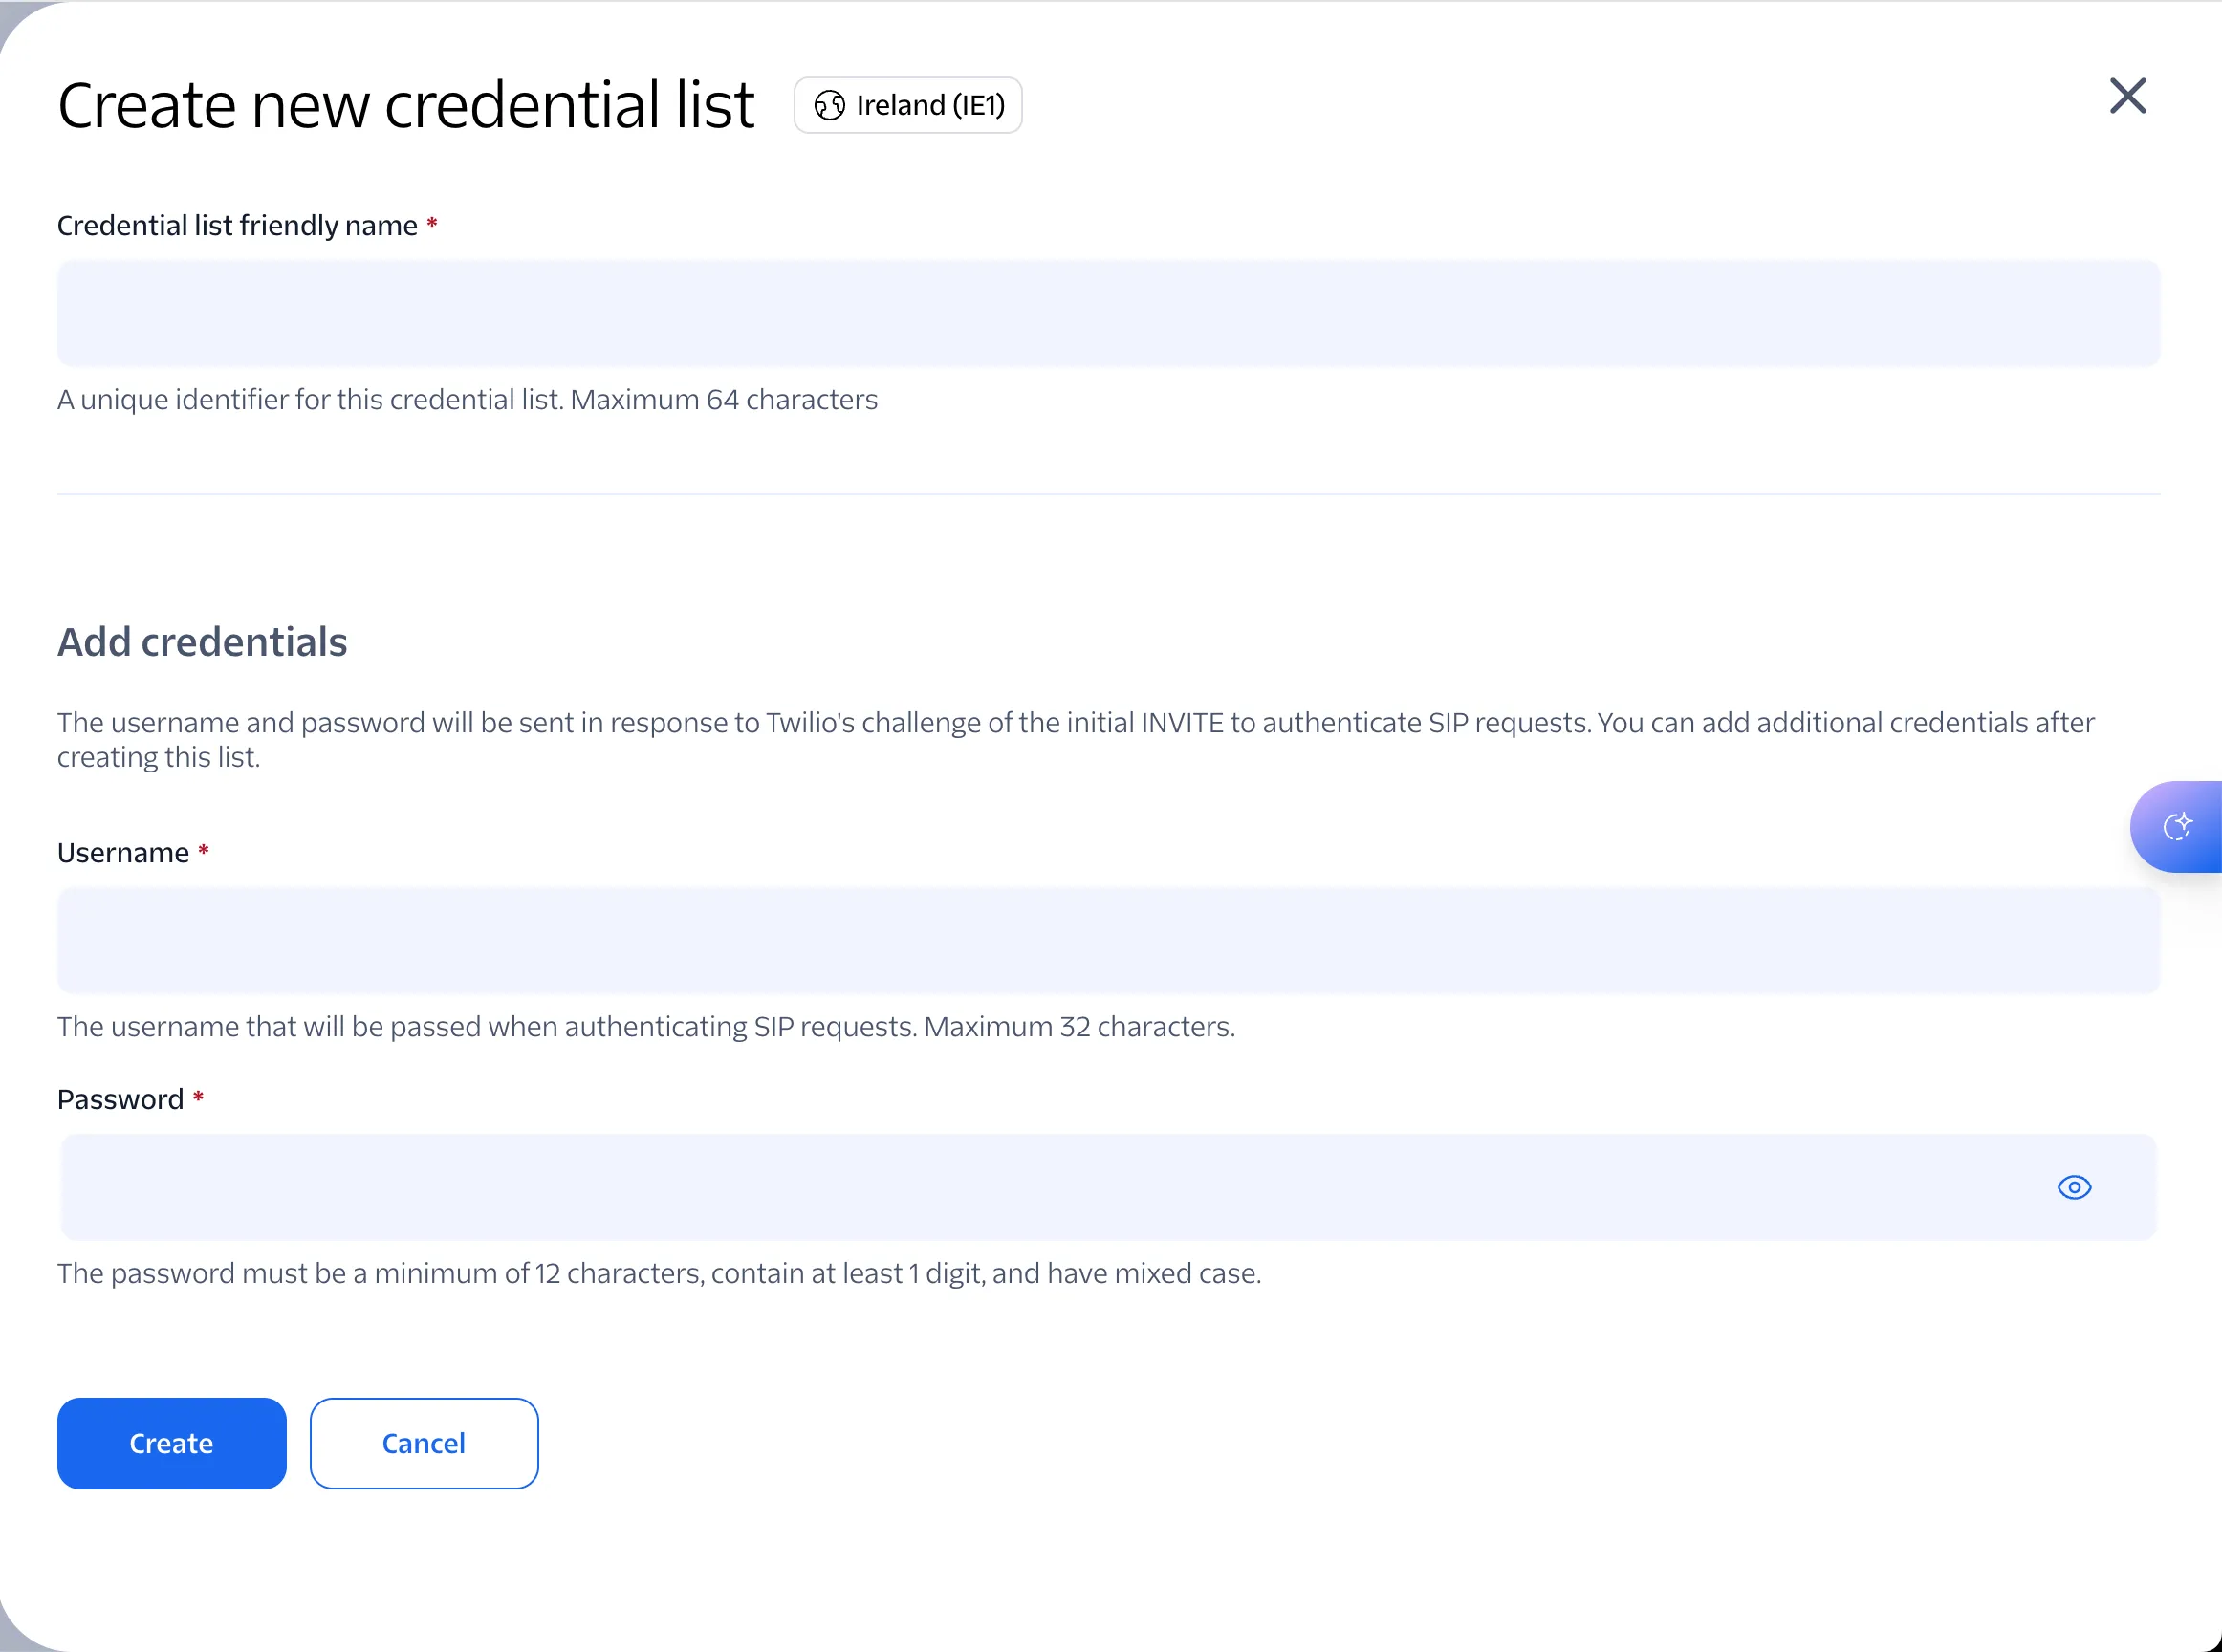
Under Credential List, create/attach a Credential List (username + password). This will be used by the Sipnetic app to login.
-
Create a SIP domain. e.g.
yournumber.sip.twilio.com.
4. Handle outgoing calls
Create a Cloudflare Worker in Cloudflare
- Workers & Pages → Create → Start with Hello World" → Deploy
- Change worker name to
outgoing.* - Click Edit code, replace the placeholder, Save and deploy
export default {
  async fetch(request) {
    const formData = await request.formData();
    let to = formData.get('To');

    // Defensive: strip any stray prefix some SIP clients add before the +
    const plusIndex = to.indexOf('+');
    if (plusIndex > 0) to = to.substring(plusIndex);

    const twiml = `<?xml version="1.0" encoding="UTF-8"?>
<Response>
    <Dial callerId="+YOUR_TWILIO_NUMBER">
        <Number>${to}</Number>
    </Dial>
</Response>`;

    return new Response(twiml, { headers: { 'Content-Type': 'text/xml' } });
  }
};
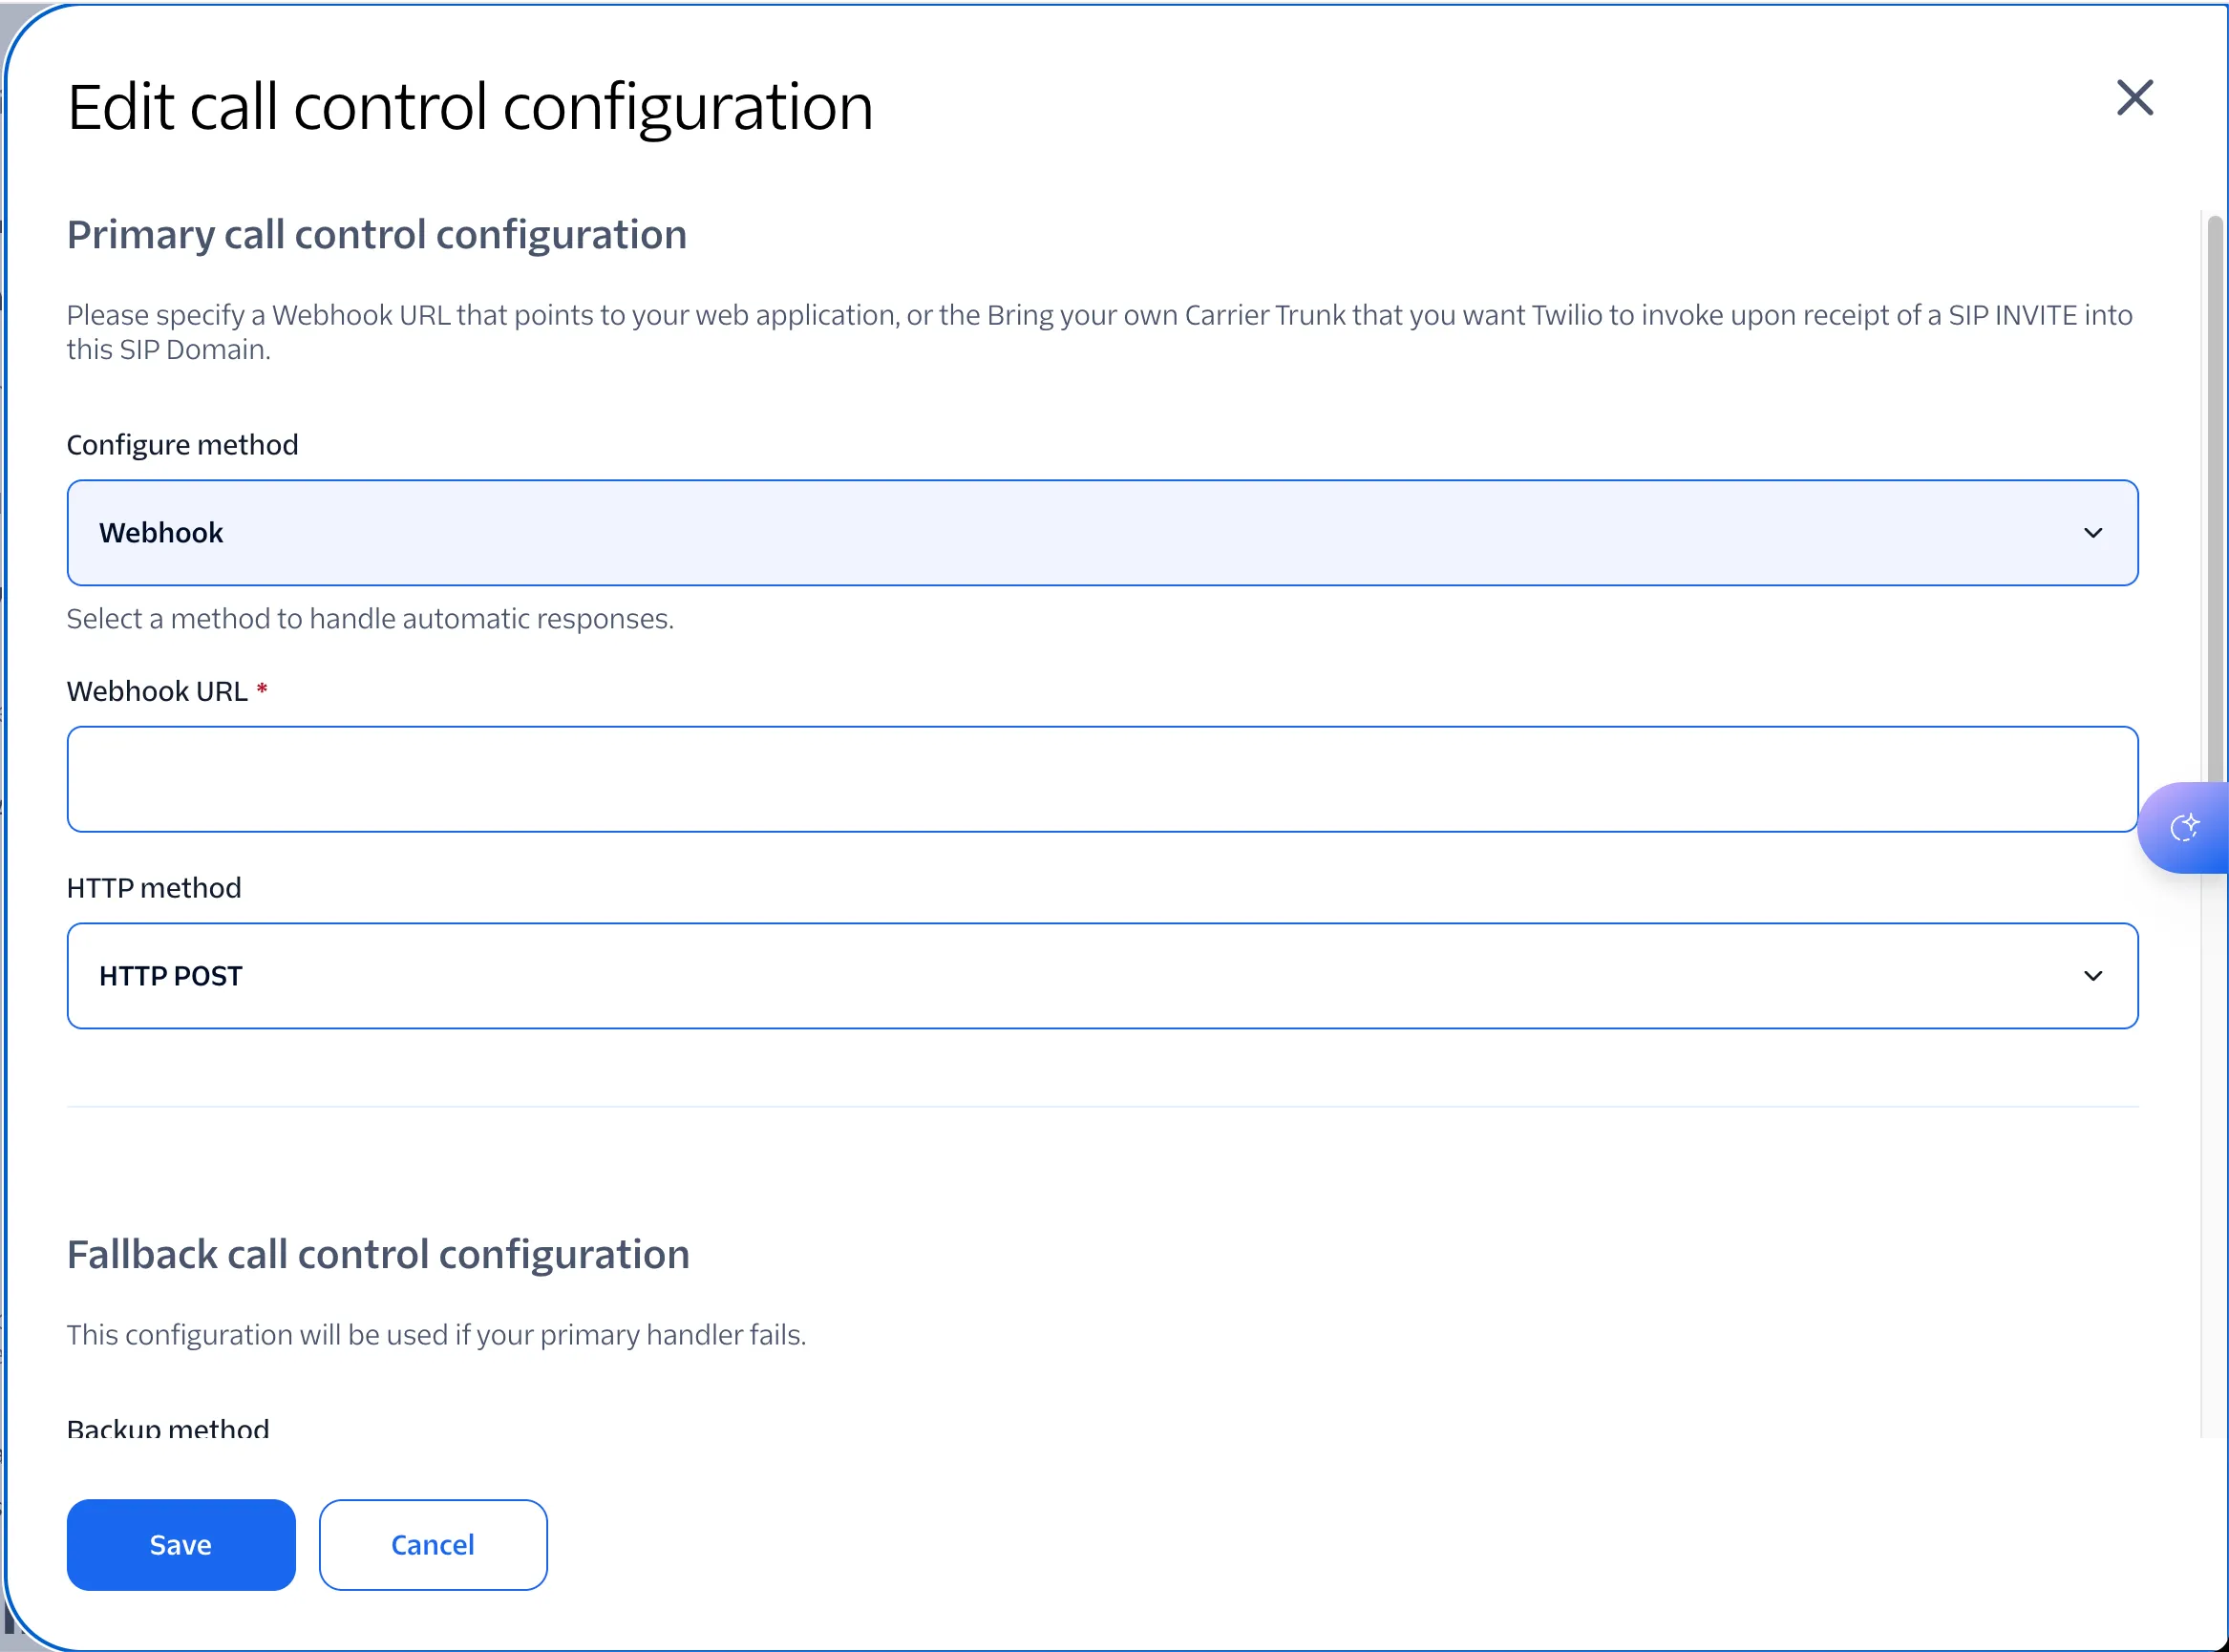
Add this link as "Webhook URL'" under SIP Domain → Details -> Call control configuration → A call comes in.
5: Handle incoming calls + voicemail (attached to the phone number)
export default {
  async fetch(request) {
    const formData = await request.formData();
    const from = formData.get('From');

    const twiml = `<?xml version="1.0" encoding="UTF-8"?>
<Response>
    <Dial timeout="20" callerId="${from}">
        <Sip>sip:YOUR_SIPNETIC_USERNAME@YOUR_DOMAIN.sip.twilio.com</Sip>
    </Dial>
    <Say voice="Polly.Joanna">Sorry, I can't take your call right now. Please leave a message after the tone.</Say>
    <Record maxLength="120" playBeep="true"
        recordingStatusCallback="https://voicemail.YOUR-SUBDOMAIN.workers.dev"
        recordingStatusCallbackMethod="POST" />
    <Say voice="Polly.Joanna">Thank you, goodbye.</Say>
</Response>`;

    return new Response(twiml, { headers: { 'Content-Type': 'text/xml' } });
  }
};
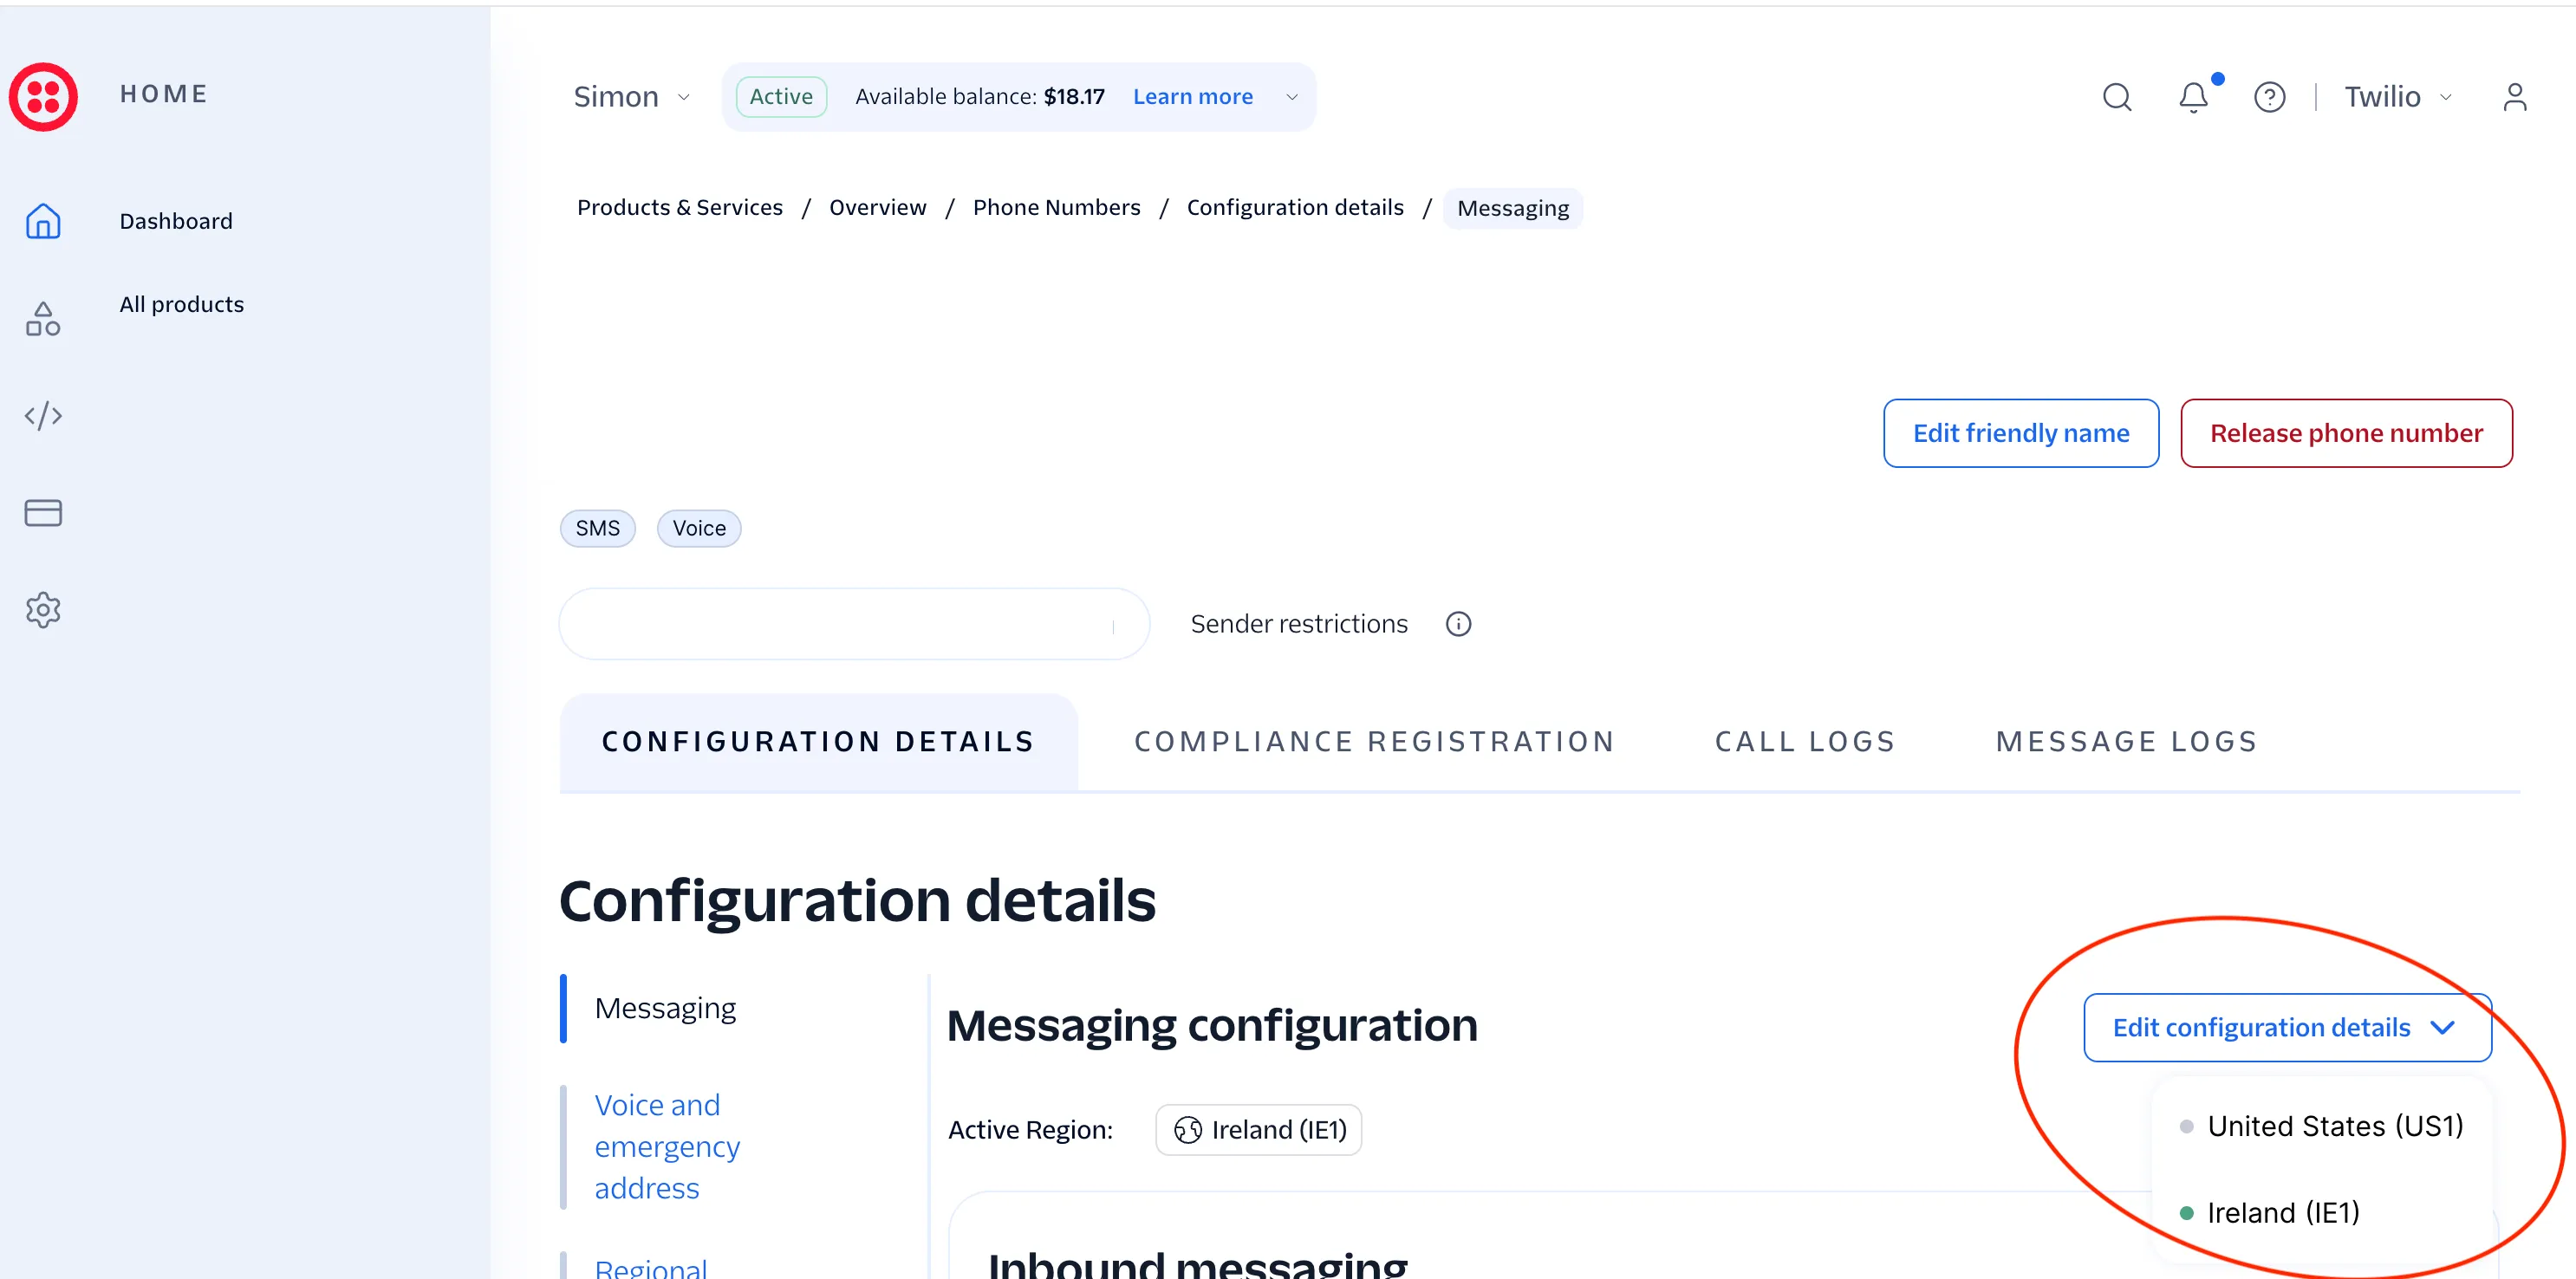
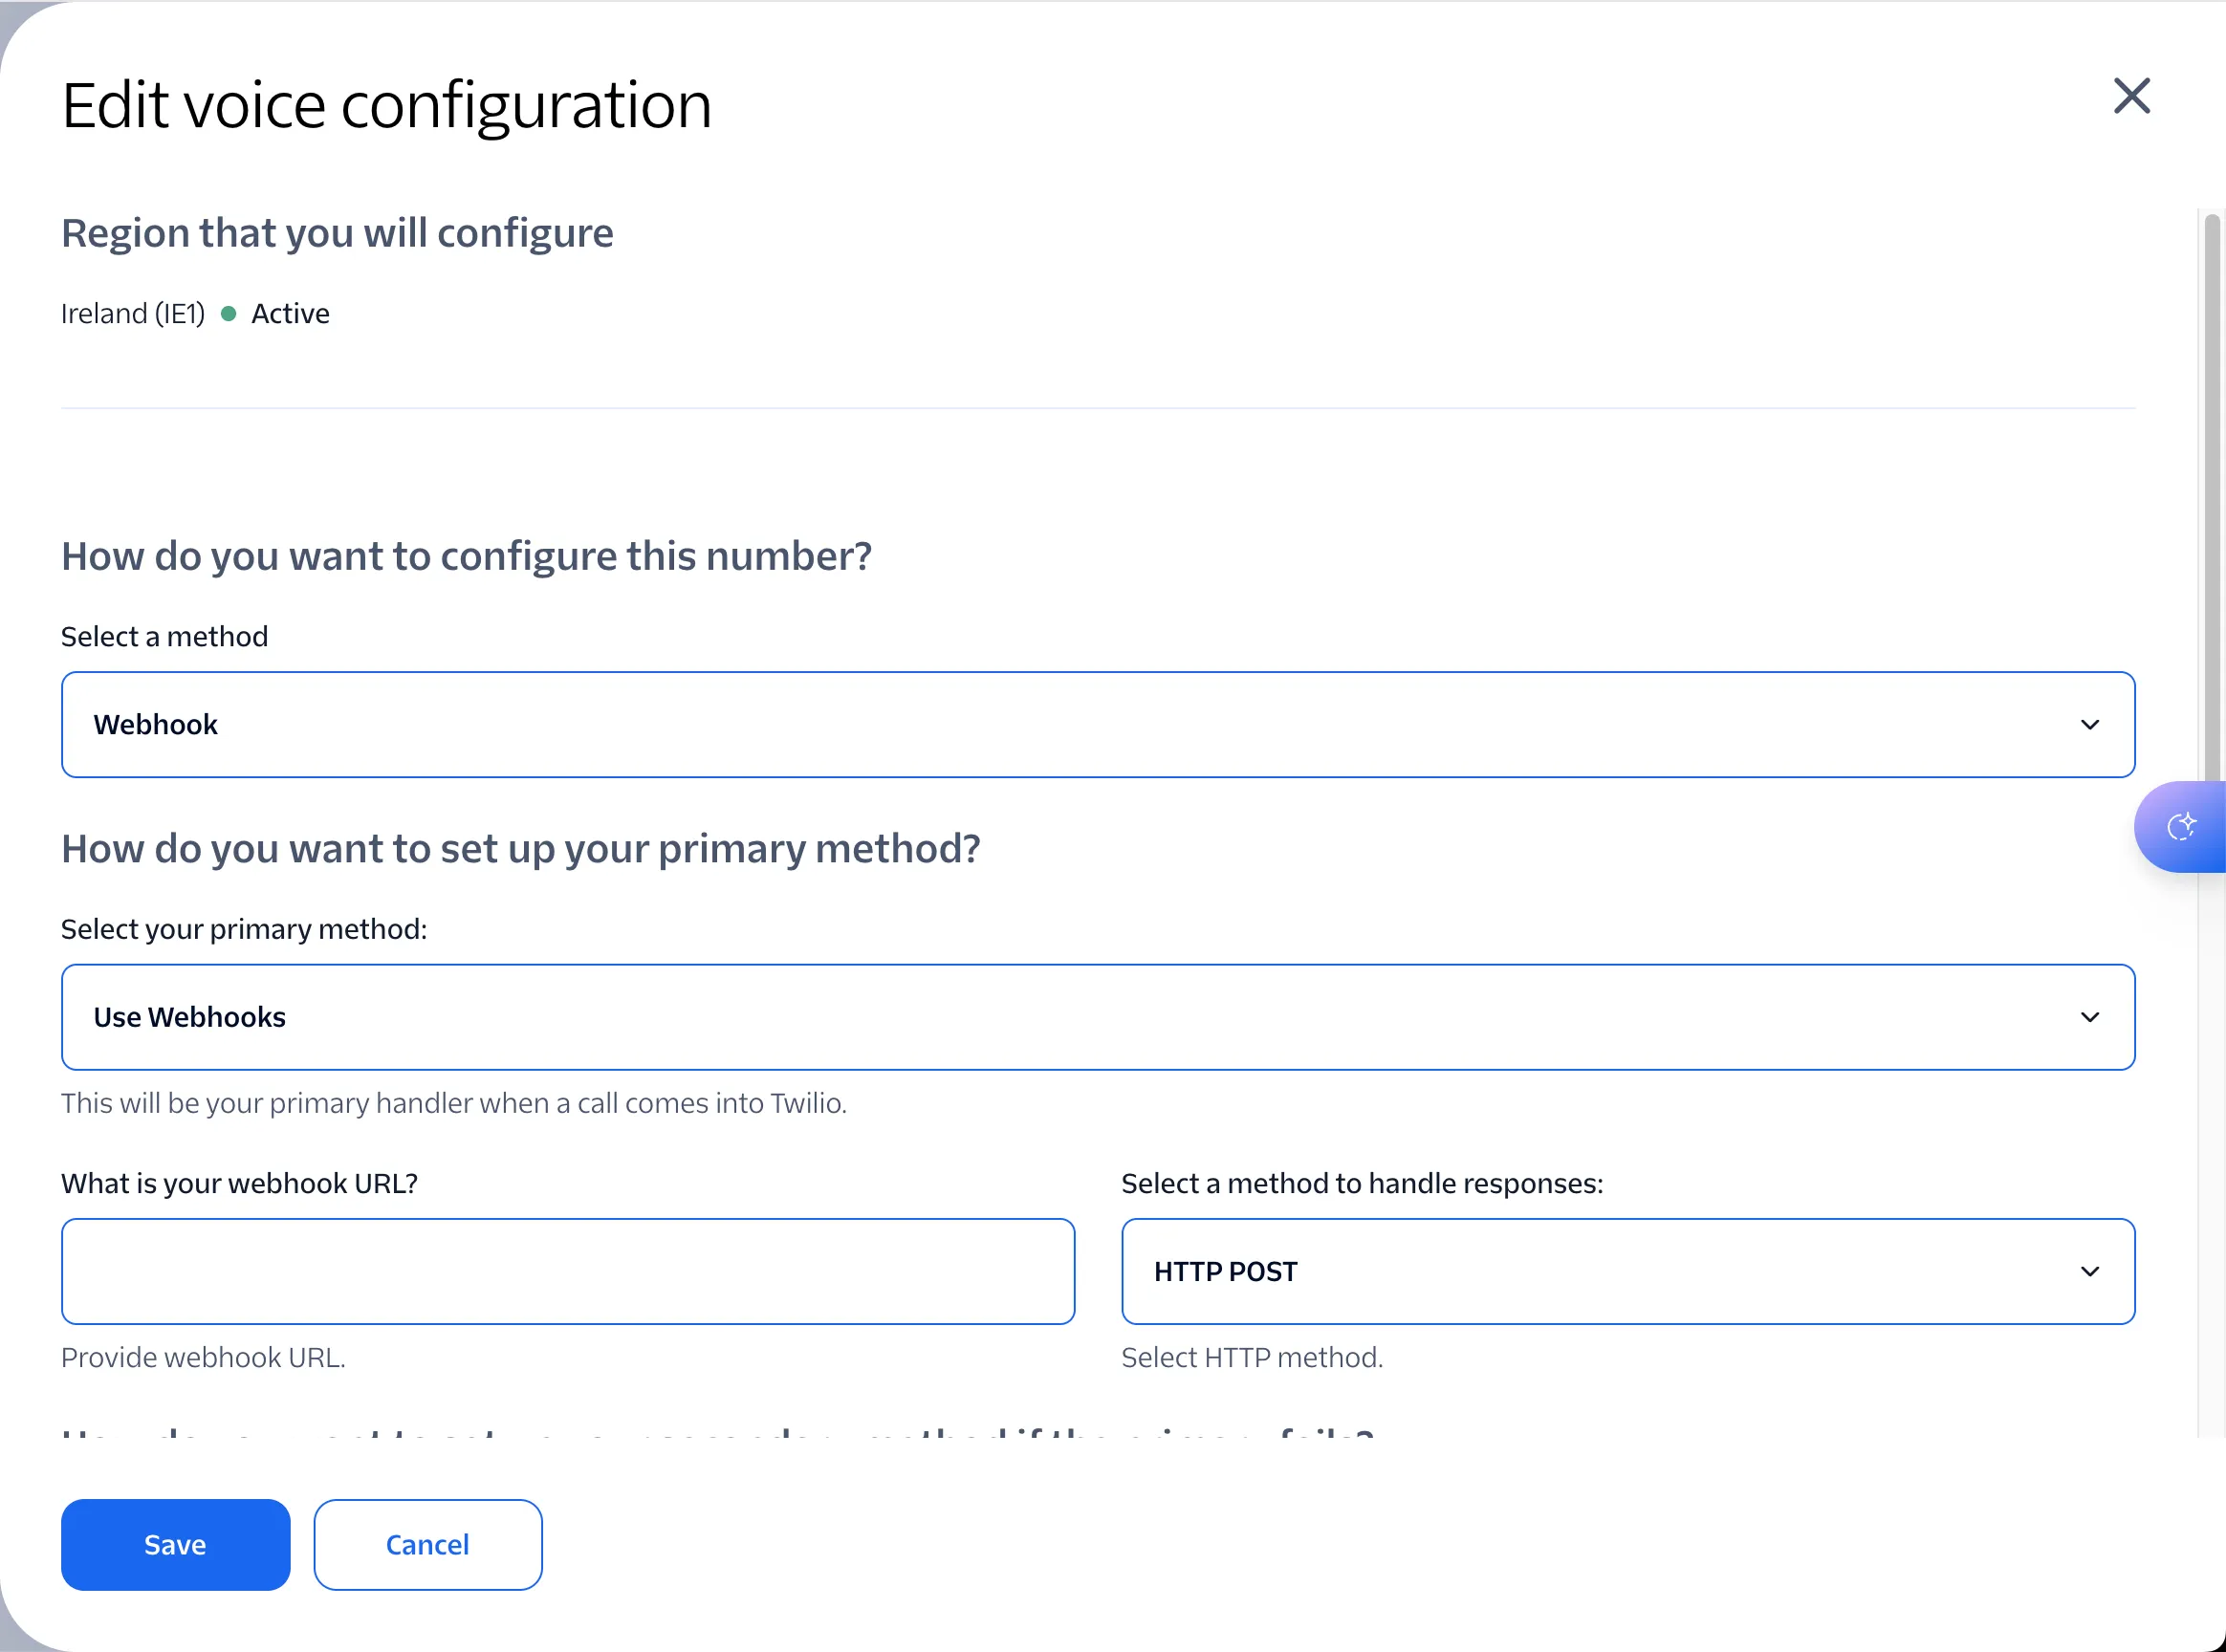
Attach this as Webhook under Products & Services -> Numbers & senders -> Overview -> Phone Numbers -> Inventory (method: Webhook, POST). Click on your number, then "Voice and emergency address" and then "edit configuration details" and your region
For voicemail, create another worker:
export default {
  async fetch(request, env) {
    const formData = await request.formData();
    const from = formData.get('From');
    const transcriptionText = formData.get('TranscriptionText');
    const recordingUrl = formData.get('RecordingUrl');
    const duration = formData.get('RecordingDuration');

    await fetch('https://api.mailjet.com/v3.1/send', {
      method: 'POST',
      headers: {
        'Authorization': 'Basic ' + btoa(`${env.MAILJET_API_KEY}:${env.MAILJET_SECRET_KEY}`),
        'Content-Type': 'application/json'
      },
      body: JSON.stringify({
        Messages: [{
          From: { Email: env.MAILJET_SENDER_EMAIL, Name: "Voicemail" },
          To: [{ Email: env.FORWARD_TO_EMAIL, Name: "Me" }],
          Subject: `Voicemail from ${from} (${duration}s)`,
          TextPart: `${transcriptionText}\n\nRecordings: https://1console.twilio.com/account/YOUR_ACCOUNT/ie1/logs/voice/call-recordings`,
          HTMLPart: `<p>${transcriptionText}</p><p><a href="https://1console.twilio.com/account/YOUR_ACCOUNT/ie1/logs/voice/call-recordings">Go to recordings</a></p>`
        }]
      })
    });

    return new Response('OK');
  }
Attach this as Webhook in the script above (for handling incoming calls), under recordingStatusCallback
6. Handle incoming SMS → forward to email
export default {
  async fetch(request, env) {
    const formData = await request.formData();
    const from = formData.get('From');
    const body = formData.get('Body');

    await fetch('https://api.mailjet.com/v3.1/send', {
      method: 'POST',
      headers: {
        'Authorization': 'Basic ' + btoa(`${env.MAILJET_API_KEY}:${env.MAILJET_SECRET_KEY}`),
        'Content-Type': 'application/json'
      },
      body: JSON.stringify({
        Messages: [{
          From: { Email: env.MAILJET_SENDER_EMAIL, Name: "SMS Forwarder" },
          To: [{ Email: env.FORWARD_TO_EMAIL, Name: "Me" }],
          Subject: `SMS from ${from}`,
          TextPart: body
        }]
      })
    });

    const twiml = `<?xml version="1.0" encoding="UTF-8"?>
<Response>
    <Message>Please reach me on WhatsApp or Signal instead — this number doesn't support replies.</Message>
</Response>`;

    return new Response(twiml, { headers: { 'Content-Type': 'text/xml' } });
  }
};
Attach this Webhook under Products & Services -> Numbers & senders -> Overview -> Phone Numbers -> Inventory (method: Webhook, POST). Click on your number, then "Messaging" and then "edit configuration details" and your region
Setting secrets
On each Worker's page: Settings → Variables and Secrets → Add, and add these as Secret type (not plain text):
SMS Worker:
MAILJET_API_KEYMAILJET_SECRET_KEYMAILJET_SENDER_EMAIL(must be a verified sender in your Mailjet account)FORWARD_TO_EMAILYour email address where you want to receive voicemail/sms
7. Download & Set-up Sipnetic app
Add a new SIP account with:
- Server:
YOUR_DOMAIN.sip.twilio.com(for registration/incoming) - Username/Password: that you created in Twilio Credential List
Once registered (status shows green/connected), you can place and receive calls!
Congrats, you now have a VOIP number that can send/receive calls, record voicemail and receive sms to email.
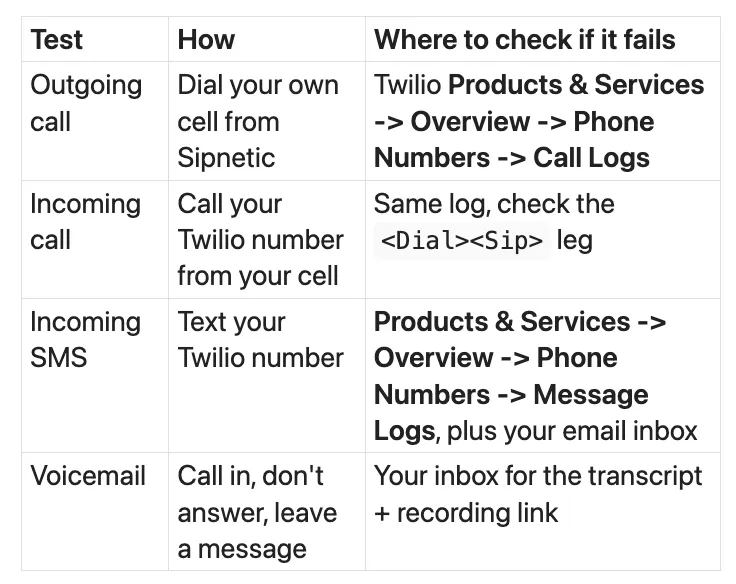
Here's a quick checklist to test everything now;
Testing checklist
Get new articles by email
Free on Substack. Unsubscribe anytime.
You'll confirm on Substack, in a new tab.
Related articles
All articles » Jun 08, 2024
Maximize Your Kobo E-Reader: RSS Integration, Calibre-Web, Custom Screensavers, and AI Integration
Discover how to unlock the full potential of your Kobo e-reader by integrating it with RSS feeds, Calibre-web, custom screensavers, and AI.
 Oct 02, 2022
The Most Productive Code I've Ever Written
Ever looked for a simple way to block social media/websites programmatically? Look no further, this is the solution for you! With this bash script, you can block any site permanently and reclaim your focus!
 Jan 01, 2022
How To Migrate From Rails to Nextjs: The Simple Edition
The journey of switching my personal site from Rails to Next.js. It covers the steps to migrate, from building to deployment and offers some insights into performance optimization and why simplicity is key
 Nov 30, 2021
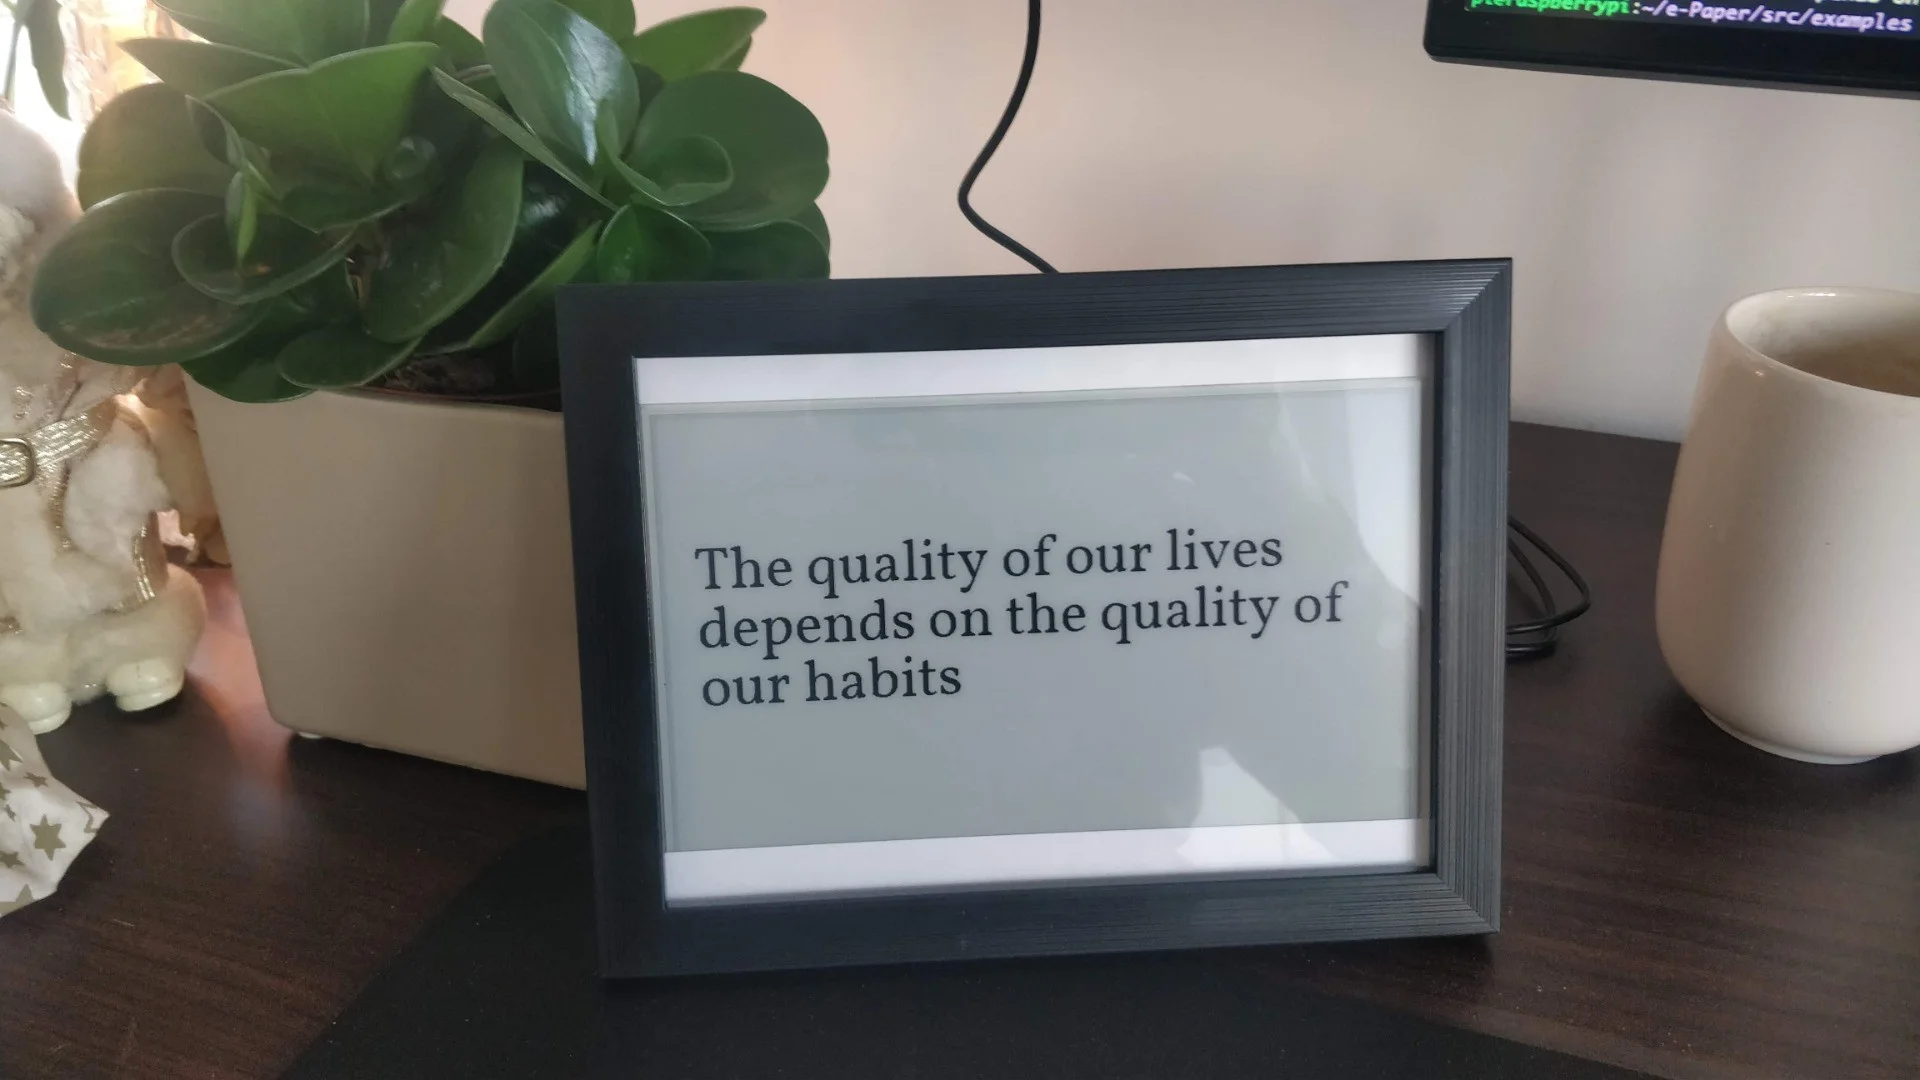
How to Make an E-Paper Quote Display (With Raspberry Pi)
If you're still looking for a cool gift for your (nerdy) friend - or just something to treat yourself - I just might have the solution! A fancy e-paper quote display to display anything you can think of!
 Dec 14, 2017
23 VSCode Extensions Every Web Developer Needs
Looking for the best code editor extensions to optimize your workflow? I got you covered. Here are all the ones you should be using in vscode!
 Mar 16, 2017
How To Query A Basic API In Ruby (RubyShorts)
Here's a quick article on how you can quickly retrieve data from an API endpoint using the open-uri and json library
Comments/Questions